My new HP dv4 notebook

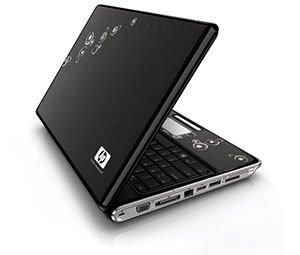
HP-Pavilion-DV4

My HP-Pavilion-DV4

I am so excited with my new notebook that I just had to write something about it.

The machine itself is a 14.1 inch widescreen, HP Pavilion dv4-2123tx model with scratch-proof outer cover and many niche stuffs to boast. It’s powered by Intel’s Core i3 processor with a neat 3GB DDR3 RAM. It is also equipped with a 512mb ATI Radeon Graphics card plus a decent Hitachi 320GB, 7200rpm hard disk.

It came with Window 7 Home Premium as the preloaded OS (that’s good since you can use Homegroup sharing with other Win 7 computers.) Then, there’s the usual plethora of peripherals, a built-in web-cam with 2 USB ports, LAN/WiFi, Multi Card Reader, Blue-tooth and 6-cell Lithium-Ion battery and most importantly the finger print reader(better security)

The guy at the sales told me the battery backup is good for 2-3 hours (know I can get better). Maybe I will get an additional 9 cell for backup, will set me back by around 5k.

Well that’s it. I love my new gadget (christened EVA by Mani) and wanted to share my fun with you. If you also own one, share your experience by leaving a comment below.

Cheers.

MoWeS Portable – Webserver on a stick

MoWeS stands for the three letter abbreviation Modular Webserver System and makes it possible, to run a webserver based on Apache, MySQL and PHP from an USB Stick or any other writable media (harddrive, flash cards etc.) without installation under Windows (98 to Vista).

There are two different versions of MoWeS. The MoWeS Portable and the MoWeS Presenter.

MoWeS Portable is the basic version and its opensource. Released under the GNU/GPL, it comes with a selectable bunch of preinstalled softwares like TYPO3, Joomla!, Mambo, WordPress, Moodle, OS Commerce, Drupal, PHPMyAdmin and many more that you can customize right on their downloads page.

To get you own copy visit the MoWes website.

How to add a program in Startup on Ubuntu

This is a simple tutorial on how to make any program to start up by default in Ubuntu:

  1. Start up the program you want to add in the startup.
  2. Open a terminal window and type the following command:xprop | grep WM_CLASSYou will notice that your cursor will change to a cross-hair. Now click on the Application which you want to be added in the startup. You will get a string back like this: WM_CLASS(STRING) = “application”, “Application”

    I got this when I clicked on my Terminal window which I am using with Tilda

    screenshot tilda ubuntu

    Screenshot Tilda Ubuntu

    the first string tells the command for terminal is tilda.

  3. Now you need the path for the application. To get the path, use the “which” command in terminal. For eg. which tilda will return me the path to the program on my machine. Just substitute whatever the first string you got in place of “tilda”
  4. The system will reply a path like : /usr/bin/tilda. In your case it will be your application path.
  5. Copy the path and open the Session Manager from System > Preferences > Sessions. You will see a window like below:

  6. Click on the add button on the right and add the path you copied from the terminal window into the window

    screenshot-add-startup-program

    Adding a Program to Startup in Ubuntu

  7. That’s it. Logoff and login again. You will find the application you added in the Session Manager will start by default.

How to navigate the Terminal in Ubuntu

The first thing I discovered after my crossover from Windows was that I have to make the Ubuntu Terminal my friend. I have been running away from the DOS prompt since I first learnt Windows back in 2002. Since then I have always been assisted by UI replacements to do all the work I should have been using the Terminal for. But after Ubuntu happened, I have had to use the Terminal pretty regularly for everything. So, I decided to put together a small list of commands I learned in the first few days I have started using Ubuntu:

The Ubuntu Terminal can be found in Applications » Accessories » Terminal. A terminal is in a way very similar to a file manager in that it’s always inside a specific folder and is able to navigate to other folders and do regular file management. By default it’s inside my home folder when I run it. To confirm that my terminal is indeed browsing my home folder, I need to type pwd ending with a press on enter. The pwd command outputs the path to the current folder.

If I want to see a list of files and directories inside the current directory, I need to run the command “ls”. If I want to navigate up the directory tree, I run “cd ..”(cd space dot dot.) If I want to navigate down the directory tree, I run “cd directoryName” where directoryName is the name of the folder I want to navigate to. For example: if I am inside my home folder and there’s a directory called “movies” inside it, I will have to run “cd movies” to go into that directory. If I want to go back I have to run “cd ..”(cd space dot dot.) If I ever get lost all I have to do is run “cd” by itself; this will take me back to my home folder.

Finally, Ubuntu

Finally got my wireless to work with Ubuntu at home too. Since Linux does not support my wireless iball usb adapter, I brought a netgear adapter from office. I’ll possibly drop down to Chandni and buy one for myself. It’s strange that iball isn’t Linux compatible. In fact It’s more expensive that netgear adapters. Anyways alls well that ends well. Now I am looking for a good Dreamweaver replacement on Ubuntu.

Ubuntu supports a system known as NDISWrapper to use Windows wireless device drivers under Ubuntu. Here’s how I configured the netgear wireless adapter:

  1. Go to System → Administration → Synaptic Package Manager and install ndisgtk
  2. Then go to System → Administration → Windows Wireless Drivers and choose Install New Driver
  3. Look for your driver. It will be a file with the extension .INF. You will find it in the Drivers folder on your driver CD that came with the usb adapter.
  4. Choose the location of your Windows .inf file and click Install.
  5. Click OK.
  6. You will find the Wireless icon activated on the Taskbar panel on the right. Click on it and select you network. If it is protected it will ask for the password. Give the password and you are now connected.

My first post from Ubuntu

I have started using Ubuntu and it’s beautiful. The installation was pretty easy, however configuring the wireless network took quite some time. Still got the office network following some online help. I am still not able to configure the wireless at my home. Maybe it’s due to my iBall hardware. I should have bought Netgear. It has much more acceptance the world over. Anyways if I get hold of a solution I sure would post it here.

ciao, viki

Finished Crysis today

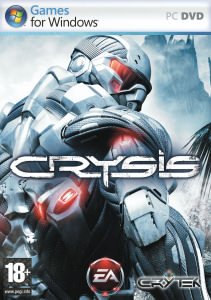
crysis-boxI just finished playing Crysis today.. and it was awesome. Though some times it tended to be monotonous during the early chapters.. it still was amazing graphics and gameplay. I enjoyed the whole game except for one level in the middle where I am inside the alien ship. That level was pretty irritating.

I only have a Geforce 7200 and so I was only able to play the game at all the lowest settings at 800×600. But even at these low settings, the game looked pretty good. Lots of games tend to have a very very tough fight towards the end and players tend to run for the cheats but this wasn’t the case here. Had a real great time playing but the ending did seem a bit hollow.. I sure am waiting whenever they come up with the sequel. It cannot just end here.

I also found this very helpful walkthrough for the game. Helped me whenever I used to get lost: Crysis Walkthrough

my blog switched to wordpress

Finally, the switch to WordPress is complete. It was very difficult emotionally replacing my earlier blog but it had to go. Created in 2005 using ColdFusion, it wasn’t suited to the web 2.0 environment and it was only a matter of time before I moved. Sigh… I still remember all the long nights I have spent working so hard on it.

Anyways moving ahead, had an easy time deciding on WordPress. It’s the leading blogging tool in the world today used on thousands of sites and seen by millions of people every day. It’s well-architectured personal publishing system built on PHP and MySQL and licensed under the GPL doesnt cost me a penny and it’s an Open Source project, which means there are hundreds of people all over the world working on it to make it better. Couldn’t ask for more.

Get WordPress

Save time accessing files with Q-Dir

Q-Dir makes your files and folders easy to manage. Fast and easy access, with an amazing Quadro-View technique. You don´t have to renounce the usual, Drag and Drop, all Views, and other functions of your system. No! Q-Dir gives you other nice functions, that make you happy. One can save many hand moves and also time!

You can you it to move files by dragging in Q-views, and other programs such as MS Explorer. It provides quick access to most often used folders. You can also use Copy/ Paste between the Q-Dir directory views, and other programs such as MS Explorer. Its also got this Color Filter that can help differentiate between file formats using different colors and since its portable you can carry it on you USB drive wherever you go.

Q-Dir

Q-Dir – The best Windows Explorer Alternative

Download Q-Dir